Patchers
Interact also has an integrated visual patcher system, much like Max/MSP and Pure Data. Although those applications are much more advanced, simple patches can be created in Interact. This allows for simple server side logic and DSP sound generation. The beauty of the patcher system lies in the fact that pit is also supported on Android clients.
Add a new client module of the type Audio Patcher. Open the patcher and make sure it is in edit mode (this should be the default). To add objects to the patcher, use the shortcut CTRL+A. Normal objects all start with a dot. Dsp objects start with ~. The patcher system is actually developed independent from Interact. Its documentation can be found here.
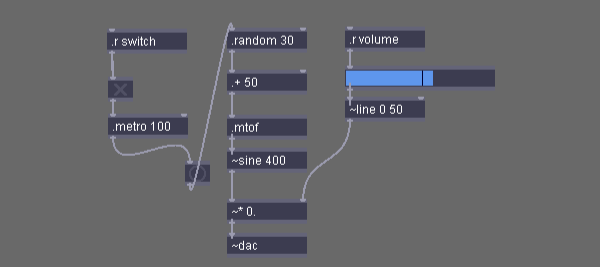
For now, try to replicate the patch below.
Most objects are created just like you see them. There are three visual objects which are created with:
.t- a toggle button.b- bang indicator.slider- a slider
When you’re ready, turn on the sound and switch to performance mode to test your patch. Even client patchers can be tested on the server.
Connecting the GUI
While the toggle button and slider allow you to easily test your patch, the patcher will not be visible when ran on the client. To control it, we need to add some gui elements and route them to this patcher.
Add a toggle button and a knob to the gui you’ve made before. Remember to set the knob Maximum value to 1. Using the target properties, connect the button to the switch endpoint of your patcher. The knob should be connected to the volume endpoint. Notice that adding .r (receive) objects in the patcher instantly adds them to the routing system.
Run on Client
To run the patcher on the client, you just connect a client and run your project. The patcher will start playing as soon as it is loaded.